
Create a True Outsourced Bill of Materials
Many companies who use Fishbowl Inventory outsource some of their manufacturing. Most companies that come to us for help manufacture, so… we have worked a lot with different forms of outsourcing manufacturing.
There are three different types of outsourcing from a Fishbowl Manufacturing perspective:
- Simple Modification
- Custom Purchase Order
- True Outsourced Bill of Materials
Simple Modification
An outsourced type option is on a line in the Purchase Order screen. I can’t express how thrilled I was when this feature was added in 2017. The option has always been there. However, when this option is selected, the part number will be a new one. Here are the steps:
- Create a Purchase Order
- Add a part to be sent to the vendor for modification: Passivation, hard coating, heat treating, drilling, etc.
- Click edit on the line. Add the new part number, and it will return as
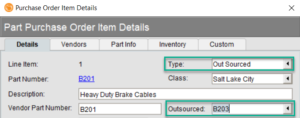
- Add the service type part to the Purchase Order and issue the purchase order
- Pick, pack and ship the Purchase Order to the Vendor
- When the vendor ships the newly modified part back, receive the new part number into stock.
- In the reconciliation wizard “land” the cost of the service performed to the value of the inventory type part.
Note: this only works for parts not tracking serial numbers, revision levels and such. I’m sure Fishbowl is thinking about that, though. That capability may be in the future.
Custom Purchase Order
Is the vendor doing all the work and providing all the raw goods and components? Don’t over think it. Sure, the vendor may perform custom manufacturing services for you. Sure, you are outsourcing your manufacturing, but the work order module Is not necessary in this case. If the vendor is not consuming any inventory from your balance sheet, then keep it simple. It’s a Purchase Order.
True Outsourced Bill of Materials
In order to track the consumption of inventory owned by you, a Work Order is required. Begin by Creating an Outsourced Bill of Materials. There are a few things you can do that will set an Outsourced Bill of Materials apart from a regular Bill of Materials.
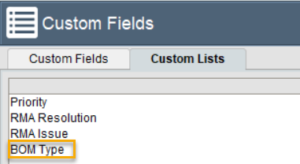
Modify the BOM type custom field list from the Custom Field Screen to include “Outsourced”.
Later you can make the BOM type “Outsourced”
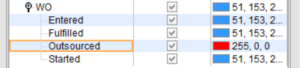
On the Calendar screen, create a new Work Order Category
Later, you can assign the new Category to the BOM.
Carefully consider the raw goods that should be placed on the BOM. Only add inventory type parts that come from your own personal stock. Don’t add any inventory type items your vendor will be providing. That is wrong. The purpose of the Work Order will be to track the consumption of your stock and the value the outsourced vendor will add.
You may need to create new part numbers to represent inventory the Vendor will provide. Some companies we’ve worked with manufacture the same thing in house they have their vendor manufacture. The vendor is used when demand exceeds warehouse space or personnel capacity, forcing them to outsource some of their manufacturing.
To assure the charges from the vendor remain flexible, consider creating a unit of measure called Dollar with the abbreviation “$”. Assign this new unit of measure to the new service type parts.
![]()
![]()
![]()
- Create service type parts to represent the service the vendor will perform.
- Also, create service type parts to represent any inventory you require the vendor to provide. The part number cannot be the same as your inventory type part number. Consider adding a “V” or some other part number modifier to indicate the difference.
Create the Outsourced Bill of Materials
- Now you are ready to create the BOM. I prefer using the shortcut on the part screen. Look up the part to be manufactured. Click “New BOM”
- Add inventory type parts to the raw goods section if you will be providing those parts.
- Add service type parts to the raw goods section if the vendor will be providing those parts.
- Add service type parts to the raw goods section if the vendor will be performing that service.
- Add any other cost you feel are important to be tracked. I.e. overhead type parts or perhaps internal labor if any. I’ve seen some companies add shipping to the BOM as well. This is more of a personal preference.
- Adjust the BOM auto create setting to work correctly for your process.
- Make the BOM type Outsourced
- Select the appropriate BOM category
- Enter the estimated time as the vendor lead time. This can be used in custom reports
- Unfortunately, default locations aren’t useful because there is no feature that sets a default location group for a bill of materials.
- Click Save!

You are now ready to test the Bill of Materials in the Work Order module!
Let us know if you would like a walkthrough of the Bill of Materials screen. Interaction and conversation with someone who has done it before is usually a more efficient and enjoyable learning experience.